Monday, December 10, 2007

Weber Jets

When I installed the new dizzy, it was recommended that I also change out the jets on the weber carb. The original jets are sized 140 and 135. Several folks who have installed recurved distributors have put in 150 primary and 155 secondary main jets. The air correction jets are left alone at 165 primary and 160 secondary.

The jets are tiny little brass screws with small holes in them. To replace the main jets you have to remove the air filter assembly and then remove the top of the carb. Removing the top is a little tricky because of the choke linkage. You can remove a small split pin that holds this in place.


After installing the new jets, I adjusted the timing and then the fuel mixture. I also altered the timing using the timing gun. With the vac on the carb plugged, I set the timing at around 14 BTDC. It doesn't ping (or knock) when I drive, so I assume this is good. Adjusting the idle took a little trial and error, and I may revisit it.

Prior to changing the jets I pulled the spark plugs. They were a little white, which can indicate a lean mixture, so the new jets were probably a good idea. The new plugs are gapped at 0.030.

Monday, December 3, 2007

National Motor Museum at Beaulieu

I took a trip to the UK recently and managed to pay a visit to the National Motor Museum at Beaulieu. This is a must see for any car enthusiast. The link to the museum's website is here:

I also took quite a few pictures which are hosted on the photobucket site here

Enjoy the pics!

Sunday, November 18, 2007

New Distributor...

Distributors are pretty simple things really, they "distribute" the spark from the coil across the four spark plugs. You'd think that there wasn't much more to it, but it turns out that there is a whole dark art to distributors - and it lies in understanding "advance". The basic idea is that as the engine revs faster, you want to the spark to be a little earlier in the combustion cycle. But how? Well distributors have springs in them that cause the rate of advance to change as they spin faster. This can also be augmented by vacuum from the carb manifold. As the engine runs faster - there is more vac - and more advance. Great stuff!

What happens if your distributor is old and tired and has worn springs and perhaps the vac advance is not working too well? In this case the engine won't get the advanced ignition that it needs at higher rpms and the power will decline. The engine will feel "bogged down" at high rpms.

Ok, so back to my car... I have noticed that at 4000rpm the engine does bog, it basically doesn't really want to rev higher. This is despite the dual barrel weber where the second barrel kicks in at higher throttle. I think these symptoms are consistent with a worn distributor. So I ordered a new (rebuilt) one from Jeff at advance distributors.

Let me say something about Jeff. Here is a guy who knows distributors - the guy is an expert and frequently posts on mgexperience.net. He rebuilds and, very importantly, recurves distributors. Recurve???? This is the process of putting in new springs and advance mechanics to make sure that the advance works as it should and also that the advance works for your specific engine set up. When you order a distributor from Jeff, you have to give him full details about your engine, carb, exhaust and other mods, so that he can set the advance just right for your set up. Its really tailor made and better than the factory set up or any that you could get from a large retailer of parts.

Back to my car, again. I also ordered Pertronix electronic ignition and a higher power Flame Thrower coil. Electronic ignition removes the need for points and is virtually maintenance free and more reliable. The Pertronix set up also gives you more consistent sparks and more steady sparks.


Swapping out a distributor is not too hard. I removed the old one after noting the position of the rotor arm (very important). I put in the new coil, and put in the new distributor and wired it all up. The little mounting bracket is a little tricky as you have to loosen it enough to get the distributor out. I ended up removing the bracket - and loosening it. The main thing is to try and put the new one back in in roughly the same angle as the old one.

When the engine was fired up - it started and I adjusted the timing to 14 BTDC. I took it for a drive and WOW!!! First of all - no bogging down. The car would red line if I let it - and this is on the highway not when parked. Second the performance, particularly at higher revs was much better (this is consistent with the old unit having tired advance).

Setting the timing is pretty easy with a timing light. Mine is a dial back type that allows you to put in the amount of advance and then you adjust the timing so that the marks are a TDC. It makes it very easy. Jeff includes his recommended timing settings for the unit when he sends it to you, so it really takes out the guess work.

He has a great article written on timing. Here is the link...
Read this before you start messing with your timing.
http://www.mgexperience.net/journal/B-racer/1818

Anyhow, all in all, a nice upgrade that without a doubt bought me some extra HP. And as most folks know, HP is not cheap. In fact, with the new exhaust, carb, and distributor, I have probably bought all the cheap HP I can.

Jeff's website is here...http://www.advanceddistributors.com/

Sunday, November 4, 2007

Brits and Battleship

I went to the Brits and Battleship car show in Wilmington NC on saturday. It was a 3 hour drive on the back roads from home, and turned out to be a really nice day out. The drive down was pretty cold, but the car ran well, although the temp guage never got above C. Makes me wonder if the thermostat is functioning - but that's another topic...

I posted some pictures of the day on a photobucket site. They are here.

http://s242.photobucket.com/albums/ff32/gatorbrit/Brits%20and%20Battleship%20Nov%202007/?start=all

I also learned how accurate my speedometer is. My friend travelled down with me and brought his GPS. At 50mph on the speedo I am doing 48mph on the GPS.

Sunday, October 14, 2007

Alternator

The alternator in my MGB is pretty much stock - a Lucas model that generates about 35 amps. The alternator is not the original, its been replaced at some point, but alternators don't last forever.  Recently, I have suspected that my alternator was on its way out.  The ignition light would stay on after the engine had started and then go out only once I started driving.  A steadily burning ignition light indicates that the car is drawing from the battery - and the alternator is not generating enough power to supply the car's needs.  

I have two voltmeters - the in dash meter which although it looks nice, is slow to register and not very precise and a plug in voltmeter that plugs into the cigarette lighter.  The plug in meter is digital and very precise.  
You can buy them at Walmart - they're really cheap and well worth getting. The voltmeter was reading for 12.3 V up to 13 V although occasionally it would hit above 13, but never over 13.5 V.  Most of the time we were in the sub 13 V range.  This is pretty good evidence that the alternator is not doing too well.  So I decided to replace it.

There are several choices for replacing an alternator.  The basic choice is a refurbished Lucas model.  This is the simplest solution, but not the best.  The basic Lucas model generates about 35amps - a charge rate that is pretty low compared to model alternators.   

The first commonly used alternative is from a 1980 Ford Fiesta.  This is in the 60 amp range and bolts on pretty easily by all accounts.  Finally, you can use a 1991 Saturn alternator that generates 96 amps and will power anything that you could ever want to run in your car!  The problem with the Saturn alternator is that it needs a different pulley and slight mods to the wiring.  But free enterprise is a wonderful thing and where there is demand, someone fills that demand and makes a buck and that's exactly what the owner of http://www.mgccars.com/ did.  I bought my new alternator from him - here's the link:  http://www.mgccars.com/96_amp_alternator_upgrade.htm.


The alternator arrived quickly and was nicely packaged with clear instructions.  
The alternator bolts on and there are just two wires to connect.  
I charged the battery and installed it this afternoon.  
When I started the car up, the voltmeter showed close to 14.5 V charging.  
When the lights were on and I taxed the system, the volts were still 14.3.

This is a great upgrade for your B and well worth doing. 

Monday, October 8, 2007

New pic of the car.

After I got it lowered I thought it was time to take a new picture...or two.
The new ride height is 15" rear (both sides) and 14.5" front right, 13.75" front left.  Still a bit of lean, but nothing to get bent out of shape about!


Swivel Axle

This summer I had the passenger's king pin replaced. I knew at the time that I needed to get the driver's side done but I decided to do it myself.
So what are we talking about here...?

31 is the king pin, and 21 is the swivel axle.
A picture of the new swivel axle is in this post...

http://1977mgb.blogspot.com/2007/09/swivel-axle-set.html

My swivel axle was badly worn - here is a pic of the lowering bushing, you can see how it is no longer centered.

Replacing the king pin on its own is tricky because there are brass bushings that run up the length of it that have to reamed and rebuilt. Although a king pin set is cheaper, unless you have a reamer and some shop skills, this is a hard job. Alternatively you can buy an entire swivel axle (they are usually sold in pairs) and just replace the whole unit. This is just a bolt on exercise and is easy to do.

1. Jack up the car and remove the wheel.
2. Remove the dust cap on the end of the axle #67
3. Remove the split pin and nut #71.
4. The wheel hub #68 will slide off and make sure you have some clean newspaper to catch the bits. You'll find a notched washer, a bearing race, some shims (very thin easy to loose in the grease), a spacer, another bearing race and a collar. Put these aside. Heres a pic.

5. Remove the brake caliper assembly and support it - don't let it dangle by the brake line unless you plan on replacing them!!! I used cable ties to attach it to the shock absorber.
6. Remove the steering lever- note that if you just remove this you shouldn't have to worry about getting the car realigned. If you take apart any other part of the steering you could mess it up. It'll look like this...

7. Undo the top and bottom bolts #42 and #32.
8. Remove the swivel axle and put a new one in.
9. You'll need to put new bushings and grease seals etc at the top and bottom bolts of the swivel.
10. Reassemble and don't forget the grease the swivel axle at the three grease nipples.
11. Reassemble the hub. I could tell you how to do this, but a video is worth a thousand words, so I refer you to John Twist of University Motors on YouTube.
http://www.youtube.com/watch?v=RJYIXZtnIiw

And thats it! You just swapped out your swivel axle.

Sway bar bushings

While I had the rear end up for the lowering blocks I replaced the sway bar bushings. Here is what the old one looks like

and here is the new one in place. There is another on the other side as well. New bushings will help tighten up the ride.

Lowering the car.

I lowered the B on Saturday. Its a straightforward job really. The lowering kit contains two springs for the front, two spacers and four U bolts for the back. It cost $159 from Brittek. Here is a picture of the kit in an earlier post.
http://1977mgb.blogspot.com/2007/10/some-stuff-in-mail.html Note that the picture includes some rebound straps and a couple of sway bar bushings that I added to my order.

Starting at the back.
1. Loosen the wheel nuts.
2. Jack up the car under the rear differential and put axle stands under the front bracket that holds the leaf springs. Remove the wheels.
3. Lower the jack under the differential to take some of the tension out the springs.
4. Undo the U bolts. When you remove the nuts spring will drop down a bit.
5. Optional: Undo the nut to the suspension arm. This will allow the bottom plate to be removed.
6. If you are this far, you might as well remove the rear springs and swap them from left to right, that way if they drivers side sags a bit, you'll reduce the sag.
7. Replace the U bolts with the new ones.
8. Reassemble with the spacer block immediately above the spring, but below the upper rubber pad. Tighten the bolts to about 26lbs torque. Don't over tighten them the bolts can break.
9. Add new shorter rebound straps.

You should end up with something like this (note the shorter rebound straps).


Moving to the front (put the back down with the wheels on!)
1. Loosen wheel nuts.
2. Jack up the car and put the axle stands under the cross member.
3. Put a jack under the spring spring pan and jack it up to take the tension of the spring. Don't go too high or you'll tip the car off the jack stands.
4. Loosen the 3 bolts that hold the spring pan that sits at the bottom of the spring. Also remove the nut for the sway bar end. Removing the bolts is a bit tricky if you don't have the jack perfectly positioned. But I just tapped them out using a punch and a hammer. When the last one goes the spring will snap down a bit.
5. Lower the jack and remove the spring.
6. Reassemble and it should look like this:


Rebound Buffers.
You have to modify the rebound buffers at the rear and front because the existing ones are not going to allow enough travel vertically. You'll keep bottoming out as you fly over speed bumps.

On the rear, I just hacksawed off an inch. On the front its more involved. On this picture the buffer is number 18. The spacer is 17.

Remove the buffer (18) and the spacer (17). Cut the spacer in half with a hacksaw and reassemble it so that it is at the top of 18 not the bottom. You have to cut it because it won't align with the holes in the top of the buffer unit. The buffer may also need to be bent a little to line up with the holes in 17.

This picture shows the spacer in the upper position. Its in the top left hand corner.

Tuesday, October 2, 2007

Voltmeter

Installing the voltmeter in place of the clock is a breeze. The clock is wired to the purple wire and black wire. Black is always ground. Purple is fused direct from the battery. I replaced the end connectors with new ones and just plugged it in. The light bulb is connected to the old light buld wire and to ground.

Wiring the voltmeter this way bypasses the ignition which means that the voltmeter is always "on". This could cause a slight draw on the battery over a long period of time, but I always shut off the battery using the battery disconnect switch so this won't be an issue in my car.

Monday, October 1, 2007

Some stuff in the mail

I ordered a lowering kit from Brittek, and a voltmeter to go where the clock is.
Here are a couple of pics of these goodies.

Levelling a leaning car

A common problem for MGBs is that they tend to lean a little to the drivers side. Speculation abounds as to the cause of this, but it seems most likely it is a function of the car being driven by one person and the springs on the left hand side getting saggy. An alternative explanation is that the car's body contorts due to the torque being created by the engine. This seems hard to believe.

My car leans, so I wanted to fix it.
Here are the original ride height numbers (measured from center of hub to bottom of chrome strip)
Original:
FL: 15"
FR: 16"
RL: 15.5"
RR: 16"
The car has a 1" lean at the front and a 1/2" lean at the back.


I then jacked up the front end and put axle stands under the front cross member. The rear ride height numbers are:
RL: 15.5
RR: 16"
From this I deduce that I have a 1/2 inch lean in my rear springs.


I then put the car back down and jacked up the rear end and put axle stands on the front of the rear spring mounts.
The front ride height numbers are:
FL: 16.5
FR: 16
Note that I the difference from left to right is only 1/2 inch not 1 inch. It seems as though the rear lean of 1/2 inch was also being reflected in the front.
It also seems reasonable to think that the front springs also have a 1/2inch sag to the left.


So, based on earlier advice, I switched the rear springs from left to right. These are the numbers I got then...
After switching the rear springs.
FL: 15.5
FR: 16
RL: 16
RR: 16

It looks like the front lean is likely due to the front springs, as the rear sag is all but gone. At this stage, I think that I will go all out and get a lowering kit
and lower the front and the back.

Saturday, September 22, 2007

Swivel Axle Set

I got the new swivel axle from the bhive.  A very nice chap by the name of Gordon helped me out and got me a rebuilt one in no time.  Here are some pictures of it.


The next job is to figure out where it all goes. Actually first I plan on doing some detailed measurements of the ride height.
 

Engine Bay


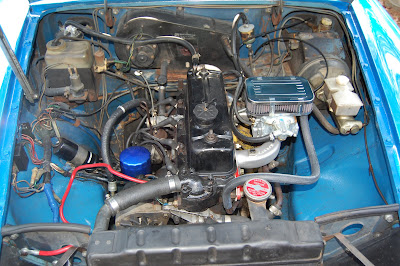
I wanted to post a hi-res picture of the engine bay, more for reference than anything else. So here it is. It ain't beautiful, but its pretty clean and tidy.

Sunday, September 16, 2007

Rebuilding the clutch slave cylinder

I finally got around to rebuilding the slave cylinder. The replacement parts from the rebuild kit from Moss are the rubber end piece and the small plastic disc. I also ordered a new piston shaft and clevis pin. The picture shows the components of the slave cylinder.

The cylinder itself was quite dirty and took a good amount of elbow grease to get it clean on the inside and outside. The metal piston head was also pretty dirty. Reassembly is pretty easy. Spring first, then plastic piston end, metal piston head and then the rubber end piece. The end piece has two metal rings, one for the inside and one for the outside.


You can see that the end hole in the old piston shaft is elongated due to wear giving the clutch a sloppy feel (or lash as I think they call it). So I was glad to replace this part - BUT the Moss part was too wide for the end of the clutch fork. Fortunately, my neighbor has a grinding wheel and we were able to grind it to the right width.

Bleeding the clutch system is a little tiring, and really must be done with two people. You'll know when its not done because you won't be able to put the car in gear. Once it was done properly, the car shifts nicely and the clutch action is smooth and easy.


Saturday, September 8, 2007

Bonnet liner

I added a padded bonnet liner this afternoon. Its made of woven material on one side with a vinyl on the facing side. It glues to the inside of the bonnet with a loctite spray - which is some seriously sticky stuff. The bonnet liner works great. It reduces engine bay noise and also keeps the bonnet cooler. The hardest part of the job was getting the bonnet back on and aligned properly.

Clutch fluid part 2...

Uh oh, I think I know why the clutch fluid is going down. Might have something to do with the little puddle on the ground underneath the car. At this stage it looks like the slave cylinder is leaking. I'll order a rebuild kit and new hose and have a go at fixing it. I'll also check the master cylinder for leaks as well. Stay tuned for part 3.

Here's what a leaky slave cylinder looks like...

Peco exhaust

Together with the new carburetor, here is the new 2" peco and header. It produces a great sound - not overly loud, but nice and throaty.


And here is a picture of the header. The header is cool because the central pipe is designed to accomodate the twin exhaust from cylinders 2&3, and balance it relative to cyls 1 & 4 which each get their own pipe.

New Carburetor

I finally got the new Weber DGV Carburetor installed together with a peco header and exhaust. The whole thing was installed by Flying Circus English Cars in Durham. First the Carb. The DGV is the manual choke version. (DAGV is water and DEGV electric). The carb is a twin barrel downdraft with the 32mm barrel opening at low throttle and the 36 opening at higher throttle. You get better gas mileage and still nice performance when you need it. The carb came with a new header as well. Here are some pics of the set up.


And a picture of the engine bay...

Wednesday, July 18, 2007

Clutch Fluid

Just a short note that I topped up the clutch fluid today - it was a little low. I need to keep an eye on that to make sure I don't have a leak. I used Castrol LMA fluid which I found at PepBoys.

Gearbox oil

I thought I would check the level of the gear box oil, and why not. According to the manuals, my late B should have a filler on the side of the box. You check the oil by looking at the level through the filler hole. Well, I don't have a side filler, instead there is a dipstick on the top which is accessible from behind the radio console. This is all a bit puzzling. Was the original gearbox replaced with an earlier model? Who knows, and the only way to find out is to locate the number on the top of the gear box (which realistically can only be done by taking the whole thing out). So I won't worry about it.

The oil level was a little on the low side, so I went ahead and drained and replaced the oil with some fresh Castrol GTX 20W50.

Tuesday, July 10, 2007

A CB radiator in a RB?

As my car is a 1977 model, it should have electric cooling fans and not a belt driven fan. The cooling fans would be on the front of the radiator in a pair and would be "pushers". The car should also have an expansion bottle for the radiator. Take a look at the pictures and you'll see something is missing.

So what is going on? Well the previous owner told me that the car had been in some front end collision. This resulted in the front end being worked on a little. In the process it looks like the radiator was replaced with an earlier model - one for a chrome bumper (pre 75 car). But it doesn't stop there. In addition the electric cooling fans which are standard on this car were removed and a belt driven cooling fan was added.

Posted by Picasa
The car runs pretty cool which is good although could be due to an overactive thermostat.
I checked the temperature sender by disconnecting the wire and grounding the end of the sensor wire. This should result in the temp going to H, which it did. So at some point I will need to check the thermostat. In the short term though, the current setup seems to do an effective job of cooling the car.

Monday, July 9, 2007

New starter relay

I got a new starter relay today. The old one is on the right, the new one on the left. It cost $3.97 from Advance.
When I went to Advance, they wanted to sell me a $30+ model for the B, and if you look in the Moss or VB catalogs - they also have pretty high priced ones. But it turns out that a relay is a relay and a generic "Bosch" type will do.

It's installed and the engine fires up every time! (well so far).
Posted by Picasa

Friday, July 6, 2007

Starter relay. The case of the missing wires...

Sometimes when I turn the key I can hear the starter solenoid engage, but I just get a click. So I decided to check the relay connections.

This is going to get detailed so grab a coffee..

According to page 78 of Rick Astley’s “MGB Electrical Systems” my late model B should have 4 wires attached to the starter relay.

Brown/White to 30
White/Red to 86
Black to 85
Brown to 87

Here’s what I have:
Brown to 30
Black to 85

White/Red and Brown/White wires connected to each other.

The first picture shows the terminals of the starter relay.

The second picture shows the white/red wires connected (with a headless nail) to the brown/white wires.

The car starts most times, but often it will require several attempts to get past the click.

When I connect the wires according to Rick Astley’s book I get nothing – no clicks, nothing.

My suspicion is that a PO decided that the relay was bad and decided to bypass it. Would the above connections bypass the relay or is there something else going on here? Is it even possible to bypass the relay?? I am guessing I probably should just get a new relay.

I submitted this question to the great folks at mgexeperience.net. I'll see what they say...

Seats...

I'm 6' 2" and when I sit in the B, the sun visor is basically directly in my line of site. I solved this by removing the visors, but they really look sort of cool. I also slouch when I drive. Today I took an alternative approach and removed the clips that hold the webbing under the drivers seat. I let the webbing sag down and I replaced the clips with some wire. It looks pretty tacky but of course you can't see it when the seat cushion is in place.

I kept the clips in case I decide to put them back

Now when I sit in the seat I look squarely through the windscreen. I think it lowered my seat by close to 2 inches. Much better. My hair won't get messed up as much either.

Thursday, June 14, 2007

Vacuum tubes

Here are the vacuum tubes that I to work on. They are left over from the Weber conversion
1. On the EGR valve - this one needs to be blocked.

2. Coming out of the front of engine block - this one should be routed to the air filter or just left open - perhaps with a make shift filter on it.

3. From the vacuum recovery tank at the back of the engine bay - this one is the de-smogger and should not be blocked - I think I can leave it open.


2 & 3 were connected to the old ZS carb.

Thanks to folks on mgexperience.net for help - here is the post that helped me.

http://www.mgexperience.net/phorum/read.php?1,577859


Wednesday, June 13, 2007

Carb Conversion to Weber 45 MCHH

Today I replaced the stock ZS carb with a Weber 45 MCHH side draft. The new carb should run better, be easier to tune and give a little more power.

Here is a pic of the ZS carb with the tubes labeled and the filter off.


Another view...


Choke...


Top view.


Removing the choke


Stock manifold after ZS removal...


Yours truly putting on the new air filter...


New carb installed....


Top view...


I still need to deal with the vacuum hoses and tune the carb a little, but it seems to run great.

Here is a link to where you can get a carb like this..

http://www.racetep.com/mgbmcch.html